Thursday, October 28, 2010

Queen against Rook and Pawn : Endings of Chess Games - Part 9


To play with correctness and skill during the end of a chess game is a very rare accomplishment (except among the very best players).

In order to assist the beginning chess student as much as possible in this branch of the game, I have put together a collection of 38 diagrams illustrating 30 different chess ending positions and the proper play necessary to win the chess game.


QUEEN AGAINST ROOK AND PAWN.

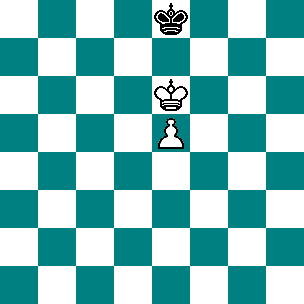
With few exceptions, arising from peculiar situations, the Queen wins also against a Rook and Pawn. Diagram 13, illustrating a won game, is from Philidor.

Diagram 13.
BLACK.
WHITE.

White moves and wins.


  WHITE.   BLACK.
 1. Q. to R's 7th. (ch.)  1. K. to K's 3d. (best.)
 2. Q. to Q. B's 7th.  2. R. to Q. B's 4th.
 3. Q. to Q's 8th.[A]  3. R. to K's 4th.
 4. Q. to K's 8th. (ch.)  4. K. to Q's 4th.
 5. Q. to Q. B's 8th.  5. R. to K's 5th. (ch.)
 6. K. to K. B's 5th.  6. R. to K's 4th. (ch.)
 7. K. to K. B's 6th.  7. R. to K's 5th.
 8. Q. to K. B's 5th. (ch.)  8. R. to K's 4th.
 9. Q. to Q's 3d. (ch.)  9. K. to Q. B's 4th.
10. Q. to Q's 2d. 10. K. to Q. B's 3d.
11. Q. to Q's 4th. 11. K. to Q's 2d.
12. Q. to Q. B's 4th. 12. R. to Q. B's 4th.
13. Q. to K. B's 7th. (ch.) 13. K. to Q. B's 3d.
14. K. to his 7th. 14. R. to K's 4th. (ch.)
15. K. to Q's 8th. 15. R. to Q. B's 4th.
16. Q. to Q's 7th. (ch.) 16. K. to Q's 4th.
17. K. to K's 7th. 17. R. to Q. B's 3d.
18. Q. to K. B's 5th. (ch.) 18. K. to Q. B's 5th.
19. K. to Q's 7th. 19. R. to Q. B's 4th.
20. Q. to K's 4th. (ch.) 20. K. to Kt's 6th.
21. K. takes P.
And wins.

[A] This is the position which White must endeavor to gain, in order that he may force the King to his Queen's 4th, in front of the Pawn.

I know that this collection of chess ending positions is limited - but it does serve to show that careful strategic play is requisite even when the stronger party feels sure of success. Be sure to review the following lessons and diagrams in this miniseries of chess game endings:
  1. King and Queen against King : Diagram 1.
  2. King and Rook against King : Diagrams 2 and 3.
  3. King and Two Bishops against King : Diagram 4.
  4. King, Bishop, and Knight against King : Diagram 5.
  5. King and Two Knights against King : The two Knights, with the assistance of the King, cannot force checkmate, except in some very rare cases.
  6. King and Pawn / King, Bishop, and Pawn / King, Knight, and Pawn against King : Diagrams 6, 7, 8, 9, and 10.
  7. Queen against a Knight or Bishop : Diagram 11.
  8. Queen against Rook : Diagram 12.
  9. Queen against Rook and Pawn : Diagram 13.
  10. Queen against Two Bishops : Diagram 14.
  11. Queen against Two Knights : Two Knights can often draw the game against a Queen.
  12. Queen against Knight and Bishop : A King with Bishop and Knight can in many cases draw the game against a King and Queen.
  13. Queen against Queen and Pawn : Diagrams 15, 16, and 17.
  14. Queen against Pawn : Diagrams 18, 19, and 20.
  15. Rook against Bishop : Diagrams 21 and 22.
  16. Rook against Knight : Diagram 23.
  17. Rook and Pawn against Bishop : Diagram 24.
  18. Rook against Three Minor Pieces : Diagram 25.
  19. Rook and Pawn against Rook : Diagram 26.
  20. Rook against One or More Pawns : Diagrams 27, 28, and 29.
  21. Rook against Two Rooks : Diagram 30.
  22. Rook and Bishop against Rook : Diagram 31.
  23. Rook against Rook and Knight : Diagram 32.
  24. King and Pawn against King and Pawn : Diagram 33.
  25. King and Two Pawns against King and Pawn : Diagram 34.
  26. King and Two Pawns against King and Two Pawns : Diagram 35.
  27. King and Two Pawns against King and Three Pawns : Diagram 36.
  28. King against Three 'Passed' Pawns : Diagram 37.
  29. King and Three 'Passed' Pawns against King and Three 'Passed' Pawns : Diagram 38.
For you beginning chess students, I invite you go through my free online chess lessons. For you advanced chess players looking for a strategic advantage, I recommend you read through some of the other miniseries including The King's Knight's Opening, The King's Bishop's Opening, The King's Gambit, The Queen's Gambit, and Irregular Openings.

Tuesday, October 26, 2010

Queen against Rook : Endings of Chess Games - Part 8


To play with correctness and skill during the end of a chess game is a very rare accomplishment (except among the very best players).

In order to assist the beginning chess student as much as possible in this branch of the game, I have put together a collection of 38 diagrams illustrating 30 different chess ending positions and the proper play necessary to win the chess game.


QUEEN AGAINST ROOK.

Diagram 12.

BLACK.
WHITE.


  WHITE.   BLACK.

 1. K. to Kt's 6th.
 2. K. to K's 6th.  2. R. to Q. B's 7th.
 3. K. to Q's 5th.  3. K. to Kt's 7th.
 4. K. to Q's 4th.  4. K. to R's 8th.
 5. K. to Q's 3d.  5. R. to Kt's 7th.
 6. Q. to K. R's 4th. (ch.)  6. K. to Kt's 8th.
 7. K. to B's 3d.  7. R. to K. R's 7th.
 8. Q. to Kt's 5th. (ch.)  8. K. to R's 8th.
 9. Q. to R's 6th. (ch.)  9. K. to Kt's 8th.
10. Q. to Kt's 6th. (ch.) 10. K. to R's 7th.
11. Q. to R's 7th. (ch.) 11. K. to Kt's 8th.
12. Q. to Kt's 8th. (ch.)
Then takes Rook, and wins.

I know that this collection of chess ending positions is limited - but it does serve to show that careful strategic play is requisite even when the stronger party feels sure of success. Be sure to review the following lessons and diagrams in this miniseries of chess game endings:
  1. King and Queen against King : Diagram 1.
  2. King and Rook against King : Diagrams 2 and 3.
  3. King and Two Bishops against King : Diagram 4.
  4. King, Bishop, and Knight against King : Diagram 5.
  5. King and Two Knights against King : The two Knights, with the assistance of the King, cannot force checkmate, except in some very rare cases.
  6. King and Pawn / King, Bishop, and Pawn / King, Knight, and Pawn against King : Diagrams 6, 7, 8, 9, and 10.
  7. Queen against a Knight or Bishop : Diagram 11.
  8. Queen against Rook : Diagram 12.
  9. Queen against Rook and Pawn : Diagram 13.
  10. Queen against Two Bishops : Diagram 14.
  11. Queen against Two Knights : Two Knights can often draw the game against a Queen.
  12. Queen against Knight and Bishop : A King with Bishop and Knight can in many cases draw the game against a King and Queen.
  13. Queen against Queen and Pawn : Diagrams 15, 16, and 17.
  14. Queen against Pawn : Diagrams 18, 19, and 20.
  15. Rook against Bishop : Diagrams 21 and 22.
  16. Rook against Knight : Diagram 23.
  17. Rook and Pawn against Bishop : Diagram 24.
  18. Rook against Three Minor Pieces : Diagram 25.
  19. Rook and Pawn against Rook : Diagram 26.
  20. Rook against One or More Pawns : Diagrams 27, 28, and 29.
  21. Rook against Two Rooks : Diagram 30.
  22. Rook and Bishop against Rook : Diagram 31.
  23. Rook against Rook and Knight : Diagram 32.
  24. King and Pawn against King and Pawn : Diagram 33.
  25. King and Two Pawns against King and Pawn : Diagram 34.
  26. King and Two Pawns against King and Two Pawns : Diagram 35.
  27. King and Two Pawns against King and Three Pawns : Diagram 36.
  28. King against Three 'Passed' Pawns : Diagram 37.
  29. King and Three 'Passed' Pawns against King and Three 'Passed' Pawns : Diagram 38.
For you beginning chess students, I invite you go through my free online chess lessons. For you advanced chess players looking for a strategic advantage, I recommend you read through some of the other miniseries including The King's Knight's Opening, The King's Bishop's Opening, The King's Gambit, The Queen's Gambit, and Irregular Openings.

Sunday, October 24, 2010

Queen against Knight or Bishop : Endings of Chess Games - Part 7


To play with correctness and skill during the end of a chess game is a very rare accomplishment (except among the very best players).

In order to assist the beginning chess student as much as possible in this branch of the game, I have put together a collection of 38 diagrams illustrating 30 different chess ending positions and the proper play necessary to win the chess game.


QUEEN AGAINST A KNIGHT OR BISHOP.

In all cases, each party is of course understood to have a King in addition to the Pieces named.

Diagram 11.
BLACK.
WHITE.


  WHITE.   BLACK.
 1. Q. to her 4th. (ch.)  1. K. to his 3d.
 2. K. to his 4th.  2. Kt. to K. Kt's 3d.
 3. Q. to her Kt's 6th. (ch.)  3. K. to B's 2d.
 4. K. to B's 5th.  4. Kt. to K's 2d. (ch.)
 5. K. to Kt's 5th.  5. Kt. to Q's 4th.
 6. Q. to her 6th.  6. Kt. to K's 2d.
 7. Q. to K. B's 6th.[A](ch.)  7. K. to his sq.
 8. Q. to K's 6th.  8. K to Q's sq.
 9. K. to B's 6th.  9. Kt. to Q. B's sq.
10. Q. to Q. B's 6th.
And you must win the Kt.

The Queen also easily wins against a Bishop.

[A] Transcriber supplied the "6th.", as the move was incomplete in the original text.

I know that this collection of chess ending positions is limited - but it does serve to show that careful strategic play is requisite even when the stronger party feels sure of success. Be sure to review the following lessons and diagrams in this miniseries of chess game endings:
  1. King and Queen against King : Diagram 1.
  2. King and Rook against King : Diagrams 2 and 3.
  3. King and Two Bishops against King : Diagram 4.
  4. King, Bishop, and Knight against King : Diagram 5.
  5. King and Two Knights against King : The two Knights, with the assistance of the King, cannot force checkmate, except in some very rare cases.
  6. King and Pawn / King, Bishop, and Pawn / King, Knight, and Pawn against King : Diagrams 6, 7, 8, 9, and 10.
  7. Queen against a Knight or Bishop : Diagram 11.
  8. Queen against Rook : Diagram 12.
  9. Queen against Rook and Pawn : Diagram 13.
  10. Queen against Two Bishops : Diagram 14.
  11. Queen against Two Knights : Two Knights can often draw the game against a Queen.
  12. Queen against Knight and Bishop : A King with Bishop and Knight can in many cases draw the game against a King and Queen.
  13. Queen against Queen and Pawn : Diagrams 15, 16, and 17.
  14. Queen against Pawn : Diagrams 18, 19, and 20.
  15. Rook against Bishop : Diagrams 21 and 22.
  16. Rook against Knight : Diagram 23.
  17. Rook and Pawn against Bishop : Diagram 24.
  18. Rook against Three Minor Pieces : Diagram 25.
  19. Rook and Pawn against Rook : Diagram 26.
  20. Rook against One or More Pawns : Diagrams 27, 28, and 29.
  21. Rook against Two Rooks : Diagram 30.
  22. Rook and Bishop against Rook : Diagram 31.
  23. Rook against Rook and Knight : Diagram 32.
  24. King and Pawn against King and Pawn : Diagram 33.
  25. King and Two Pawns against King and Pawn : Diagram 34.
  26. King and Two Pawns against King and Two Pawns : Diagram 35.
  27. King and Two Pawns against King and Three Pawns : Diagram 36.
  28. King against Three 'Passed' Pawns : Diagram 37.
  29. King and Three 'Passed' Pawns against King and Three 'Passed' Pawns : Diagram 38.
For you beginning chess students, I invite you go through my free online chess lessons. For you advanced chess players looking for a strategic advantage, I recommend you read through some of the other miniseries including The King's Knight's Opening, The King's Bishop's Opening, The King's Gambit, The Queen's Gambit, and Irregular Openings.

Friday, October 22, 2010

King and Pawn or King, Bishop,and Pawn or King, Knight and Pawn against King : Endings of Chess Games - Part 6


To play with correctness and skill during the end of a chess game is a very rare accomplishment (except among the very best players).

In order to assist the beginning chess student as much as possible in this branch of the game, I have put together a collection of 38 diagrams illustrating 30 different chess ending positions and the proper play necessary to win the chess game.


KING AND PAWN, or KING, BISHOP, AND PAWN, or KING, KNIGHT, AND PAWN
AGAINST KING.

When one Pawn only is left on the board, supported by its King, and the adverse King is either in front of the Pawn, or within such distance as to be able to intercept it, it becomes a point of great nicety in some cases, to calculate whether or not you have the power of Queening the Pawn, and therefore of winning the game. This frequently depends upon your gaining the opposition, which you cannot always do. In the next position (see Diagram 6) you have the opposition, and if Black have to play you will win. Thus:

Diagram 6.
BLACK.
WHITE.


1. K. to his sq.
2. P. to K's 7th. 2. K. to his 2d.
3. K. to B's 7th, and
4. P. Queens.

But if you move first, the game is drawn; for if you play P. to K's 7th (ch.), Black moves King to his square, and you must either abandon the Pawn or give stalemate. You will find, on trial, that any other mode of play on your part will produce the same result,—from which is deduced this important general rule: That if you can advance the Pawn to its 7th sq., not giving check, you will win; but that if the Pawn checks at this point, you will only draw.

Diagram 7.
BLACK.
WHITE.

In this position (see Diagram 7), you will win either with or without the move; for if Black have to play, he is forced to allow your King to be moved either to B's 7th or Q's 7th sq.; and if you move you gain the opposition, by playing K. to B's 6th or Q's 6th, and then P. to K's 6th. It is evident that this would equally hold good if your Pawn were any number of squares less advanced; so that you invariably win, if you can succeed in placing your King on the sixth square of the file occupied by your Pawn, and in front of it; provided, of course, that the single King cannot attack the Pawn, so as to compel you to retreat in order to support it. It is perhaps scarcely necessary to observe, that if the Pawn be upon either of the Rooks' files, these remarks will not apply—this contingency will be considered hereafter.

Diagram 8.
BLACK.
WHITE.


  WHITE.   BLACK.
1. K. to Q's 2d. 1. K. to his 2d.
2. K. to his 3d. 2. K. to his 3d.
3. K. to his 4th. 3. K. to B's 3d.
4. K. to Q's 5th. 4. K. to K's 2d.
5. K. to his 5th. 5. K. to B's 2d.
6. K. to Q's 6th.

If he play K. to B's 3d, you advance P. to K's 4th, then to K's 5th, and on his afterwards moving K. to his sq., you gain the opposition, as shown before.


6. K. to his sq.,

or to B's sq.
7. K. to K's 6th.
And then advances Pawn, winning.

Next, suppose Black has the move, and he will draw:


  WHITE.   BLACK.

1. K. to K's 2d.
2. K. to Q's 2d. 2. K. to his 3d.
3. K. to his 3d. 3. K. to his 4th.
4. K. to Q's 3d. 4. K. to Q's 4th.
5. P. to K's 3d, or

to K's 4th. (ch.)
5. K. to K's 4th.

And it is clear that, play as you may, you can only draw the game. The only exception in all the foregoing cases is to be found, as has already been remarked, when the Pawn is upon either of the Rooks' files. In these instances, Black will invariably draw the game when his King can be placed on any part of the file in front of the Pawn, it being quite immaterial at what distance the adverse King and Pawn may be. Even, as in the next example, the player of the single King will draw the game, if he have not the move, against two Pawns in a somewhat similar position. For White being to move, he can only play K. to R's 8th, to which Black must reply by K. to B's sq.; and if White then advance B's Pawn, it will be taken: or if he play R's Pawn, Black returns K. to B's 2d, and his adversary is stalemated. (See Diagram 9.)

Diagram 9.
BLACK.
WHITE.

Two united Pawns, with their King, always win against King alone. Another advantage in having two Pawns thus situated is, that they can always maintain themselves until the arrival of the King to their support; for should one be taken, the other will advance to Queen. In the next position (see Diagram 10), White wins by advancing K. to Kt's 5th, then Queening Rook's Pawn, and upon that being taken, playing K. to R's 6th, or B's 6th, having the opposition.

Diagram 10.
BLACK.
WHITE.

I know that this collection of chess ending positions is limited - but it does serve to show that careful strategic play is requisite even when the stronger party feels sure of success. Be sure to review the following lessons and diagrams in this miniseries of chess game endings:
  1. King and Queen against King : Diagram 1.
  2. King and Rook against King : Diagrams 2 and 3.
  3. King and Two Bishops against King : Diagram 4.
  4. King, Bishop, and Knight against King : Diagram 5.
  5. King and Two Knights against King : The two Knights, with the assistance of the King, cannot force checkmate, except in some very rare cases.
  6. King and Pawn / King, Bishop, and Pawn / King, Knight, and Pawn against King : Diagrams 6, 7, 8, 9, and 10.
  7. Queen against a Knight or Bishop : Diagram 11.
  8. Queen against Rook : Diagram 12.
  9. Queen against Rook and Pawn : Diagram 13.
  10. Queen against Two Bishops : Diagram 14.
  11. Queen against Two Knights : Two Knights can often draw the game against a Queen.
  12. Queen against Knight and Bishop : A King with Bishop and Knight can in many cases draw the game against a King and Queen.
  13. Queen against Queen and Pawn : Diagrams 15, 16, and 17.
  14. Queen against Pawn : Diagrams 18, 19, and 20.
  15. Rook against Bishop : Diagrams 21 and 22.
  16. Rook against Knight : Diagram 23.
  17. Rook and Pawn against Bishop : Diagram 24.
  18. Rook against Three Minor Pieces : Diagram 25.
  19. Rook and Pawn against Rook : Diagram 26.
  20. Rook against One or More Pawns : Diagrams 27, 28, and 29.
  21. Rook against Two Rooks : Diagram 30.
  22. Rook and Bishop against Rook : Diagram 31.
  23. Rook against Rook and Knight : Diagram 32.
  24. King and Pawn against King and Pawn : Diagram 33.
  25. King and Two Pawns against King and Pawn : Diagram 34.
  26. King and Two Pawns against King and Two Pawns : Diagram 35.
  27. King and Two Pawns against King and Three Pawns : Diagram 36.
  28. King against Three 'Passed' Pawns : Diagram 37.
  29. King and Three 'Passed' Pawns against King and Three 'Passed' Pawns : Diagram 38.
For you beginning chess students, I invite you go through my free online chess lessons. For you advanced chess players looking for a strategic advantage, I recommend you read through some of the other miniseries including The King's Knight's Opening, The King's Bishop's Opening, The King's Gambit, The Queen's Gambit, and Irregular Openings.

Wednesday, October 20, 2010

King and Two Knights against King : Endings of Chess Games - Part 5


To play with correctness and skill during the end of a chess game is a very rare accomplishment (except among the very best players).

In order to assist the beginning chess student as much as possible in this branch of the game, I have put together a collection of 38 diagrams illustrating 30 different chess ending positions and the proper play necessary to win the chess game.


KING AND TWO KNIGHTS AGAINST KING.

The two Knights, with the assistance of the King, cannot force checkmate, except in some very rare cases.

I know that this collection of chess ending positions is limited - but it does serve to show that careful strategic play is requisite even when the stronger party feels sure of success. Be sure to review the following lessons and diagrams in this miniseries of chess game endings:
  1. King and Queen against King : Diagram 1.
  2. King and Rook against King : Diagrams 2 and 3.
  3. King and Two Bishops against King : Diagram 4.
  4. King, Bishop, and Knight against King : Diagram 5.
  5. King and Two Knights against King : The two Knights, with the assistance of the King, cannot force checkmate, except in some very rare cases.
  6. King and Pawn / King, Bishop, and Pawn / King, Knight, and Pawn against King : Diagrams 6, 7, 8, 9, and 10.
  7. Queen against a Knight or Bishop : Diagram 11.
  8. Queen against Rook : Diagram 12.
  9. Queen against Rook and Pawn : Diagram 13.
  10. Queen against Two Bishops : Diagram 14.
  11. Queen against Two Knights : Two Knights can often draw the game against a Queen.
  12. Queen against Knight and Bishop : A King with Bishop and Knight can in many cases draw the game against a King and Queen.
  13. Queen against Queen and Pawn : Diagrams 15, 16, and 17.
  14. Queen against Pawn : Diagrams 18, 19, and 20.
  15. Rook against Bishop : Diagrams 21 and 22.
  16. Rook against Knight : Diagram 23.
  17. Rook and Pawn against Bishop : Diagram 24.
  18. Rook against Three Minor Pieces : Diagram 25.
  19. Rook and Pawn against Rook : Diagram 26.
  20. Rook against One or More Pawns : Diagrams 27, 28, and 29.
  21. Rook against Two Rooks : Diagram 30.
  22. Rook and Bishop against Rook : Diagram 31.
  23. Rook against Rook and Knight : Diagram 32.
  24. King and Pawn against King and Pawn : Diagram 33.
  25. King and Two Pawns against King and Pawn : Diagram 34.
  26. King and Two Pawns against King and Two Pawns : Diagram 35.
  27. King and Two Pawns against King and Three Pawns : Diagram 36.
  28. King against Three 'Passed' Pawns : Diagram 37.
  29. King and Three 'Passed' Pawns against King and Three 'Passed' Pawns : Diagram 38.
For you beginning chess students, I invite you go through my free online chess lessons. For you advanced chess players looking for a strategic advantage, I recommend you read through some of the other miniseries including The King's Knight's Opening, The King's Bishop's Opening, The King's Gambit, The Queen's Gambit, and Irregular Openings.

Monday, October 18, 2010

King, Bishop, and Knight against King : Endings of Chess Games - Part 4


To play with correctness and skill during the end of a chess game is a very rare accomplishment (except among the very best players).

In order to assist the beginning chess student as much as possible in this branch of the game, I have put together a collection of 38 diagrams illustrating 30 different chess ending positions and the proper play necessary to win the chess game.


KING, BISHOP, AND KNIGHT, AGAINST KING.

Diagram 5. 

BLACK.
WHITE.


  WHITE.   BLACK.
 1. Kt. to K. B's 7th. (ch.)  1. K. to Kt's sq.
 2. B. to K's 4th.  2. K. to B's sq.
 3. B. to K. R's 7th.  3. K. to his sq.
 4. Kt. to K's 5th.  4. K. to his B's sq.
 5. Kt. to Q's 7th. (ch.)  5. K. to his sq.
 6. K. to his 6th.  6. K. to Q's sq.
 7. K. to Q's 6th.  7. K. to his sq. (best)
 8. B. to K. Kt's 6th. (ch.)  8. K. to Q's sq.
 9. Kt. to Q. B's 5th.  9. K. to Q. B's sq.
10. K. B. to his 7th. 10. K. to Q's sq.
11. Kt. to Q. Kt's 7th. (ch.) 11. K. to Q. B's sq.
12. K. to Q. B's 6th. 12. K. to Q. Kt's sq.
13. K. to Q. Kt's 6th. 13. K. to Q. B's sq.
14. B. to K's 6th. (ch.) 14. K. to Q. Kt's sq.
15. Kt. to Q. B's 5th. 15. K. to Q. R's sq.
16. B. to Q's 7th. 16. K. to Q. Kt's sq.
17. Kt. to Q. R's 6th. (ch.) 17. K. to Q. R's sq.
18. B. to Q. B's 6th. (checkmate.)

I know that this collection of chess ending positions is limited - but it does serve to show that careful strategic play is requisite even when the stronger party feels sure of success. Be sure to review the following lessons and diagrams in this miniseries of chess game endings:
  1. King and Queen against King : Diagram 1.
  2. King and Rook against King : Diagrams 2 and 3.
  3. King and Two Bishops against King : Diagram 4.
  4. King, Bishop, and Knight against King : Diagram 5.
  5. King and Two Knights against King : The two Knights, with the assistance of the King, cannot force checkmate, except in some very rare cases.
  6. King and Pawn / King, Bishop, and Pawn / King, Knight, and Pawn against King : Diagrams 6, 7, 8, 9, and 10.
  7. Queen against a Knight or Bishop : Diagram 11.
  8. Queen against Rook : Diagram 12.
  9. Queen against Rook and Pawn : Diagram 13.
  10. Queen against Two Bishops : Diagram 14.
  11. Queen against Two Knights : Two Knights can often draw the game against a Queen.
  12. Queen against Knight and Bishop : A King with Bishop and Knight can in many cases draw the game against a King and Queen.
  13. Queen against Queen and Pawn : Diagrams 15, 16, and 17.
  14. Queen against Pawn : Diagrams 18, 19, and 20.
  15. Rook against Bishop : Diagrams 21 and 22.
  16. Rook against Knight : Diagram 23.
  17. Rook and Pawn against Bishop : Diagram 24.
  18. Rook against Three Minor Pieces : Diagram 25.
  19. Rook and Pawn against Rook : Diagram 26.
  20. Rook against One or More Pawns : Diagrams 27, 28, and 29.
  21. Rook against Two Rooks : Diagram 30.
  22. Rook and Bishop against Rook : Diagram 31.
  23. Rook against Rook and Knight : Diagram 32.
  24. King and Pawn against King and Pawn : Diagram 33.
  25. King and Two Pawns against King and Pawn : Diagram 34.
  26. King and Two Pawns against King and Two Pawns : Diagram 35.
  27. King and Two Pawns against King and Three Pawns : Diagram 36.
  28. King against Three 'Passed' Pawns : Diagram 37.
  29. King and Three 'Passed' Pawns against King and Three 'Passed' Pawns : Diagram 38.
For you beginning chess students, I invite you go through my free online chess lessons. For you advanced chess players looking for a strategic advantage, I recommend you read through some of the other miniseries including The King's Knight's Opening, The King's Bishop's Opening, The King's Gambit, The Queen's Gambit, and Irregular Openings.

Saturday, October 16, 2010

King and Two Bishops against King: Endings of Chess Games - Part 3


To play with correctness and skill during the end of a chess game is a very rare accomplishment (except among the very best players).

In order to assist the beginning chess student as much as possible in this branch of the game, I have put together a collection of 38 diagrams illustrating 30 different chess ending positions and the proper play necessary to win the chess game.


KING AND TWO BISHOPS AGAINST KING.

Diagram 4. 

BLACK.
WHITE.


  WHITE.   BLACK.
 1. K. B. to K. R's 3d.  1. K. to Q's sq.
 2. Q. B. to K. B's 4th.  2. K. to K's 2d.
 3. K. to his 2d.  3. K. to K. B's 3d.
 4. K. to K. B's 3d.  4. K. to K's 2d.
 5. K. B. to K. B's 5th.  5. K. to K. B's 3d.
 6. K. to his Kt's 4th.  6. K. to his 2d.
 7. K. to his Kt's 5th.  7. K. to Q's sq.
 8. K. to his B's 6th.  8. K. to K's sq.
 9. Q. B. to Q. B's 7th.  9. K. to B's sq.
10. K. B. to Q's 7th. 10. K. to Kt's sq.
11. K. to his Kt's 6th. 11. K. to B's sq.
12. Q. B. to Q's 6th. (ch.) 12. K. to Kt's sq.
13. K. B. to K's 6th. (ch.) 13. K. to R's sq.
14. Q. B. checkmates.

I know that this collection of chess ending positions is limited - but it does serve to show that careful strategic play is requisite even when the stronger party feels sure of success. Be sure to review the following lessons and diagrams in this miniseries of chess game endings:
  1. King and Queen against King : Diagram 1.
  2. King and Rook against King : Diagrams 2 and 3.
  3. King and Two Bishops against King : Diagram 4.
  4. King, Bishop, and Knight against King : Diagram 5.
  5. King and Two Knights against King : The two Knights, with the assistance of the King, cannot force checkmate, except in some very rare cases.
  6. King and Pawn / King, Bishop, and Pawn / King, Knight, and Pawn against King : Diagrams 6, 7, 8, 9, and 10.
  7. Queen against a Knight or Bishop : Diagram 11.
  8. Queen against Rook : Diagram 12.
  9. Queen against Rook and Pawn : Diagram 13.
  10. Queen against Two Bishops : Diagram 14.
  11. Queen against Two Knights : Two Knights can often draw the game against a Queen.
  12. Queen against Knight and Bishop : A King with Bishop and Knight can in many cases draw the game against a King and Queen.
  13. Queen against Queen and Pawn : Diagrams 15, 16, and 17.
  14. Queen against Pawn : Diagrams 18, 19, and 20.
  15. Rook against Bishop : Diagrams 21 and 22.
  16. Rook against Knight : Diagram 23.
  17. Rook and Pawn against Bishop : Diagram 24.
  18. Rook against Three Minor Pieces : Diagram 25.
  19. Rook and Pawn against Rook : Diagram 26.
  20. Rook against One or More Pawns : Diagrams 27, 28, and 29.
  21. Rook against Two Rooks : Diagram 30.
  22. Rook and Bishop against Rook : Diagram 31.
  23. Rook against Rook and Knight : Diagram 32.
  24. King and Pawn against King and Pawn : Diagram 33.
  25. King and Two Pawns against King and Pawn : Diagram 34.
  26. King and Two Pawns against King and Two Pawns : Diagram 35.
  27. King and Two Pawns against King and Three Pawns : Diagram 36.
  28. King against Three 'Passed' Pawns : Diagram 37.
  29. King and Three 'Passed' Pawns against King and Three 'Passed' Pawns : Diagram 38.
For you beginning chess students, I invite you go through my free online chess lessons. For you advanced chess players looking for a strategic advantage, I recommend you read through some of the other miniseries including The King's Knight's Opening, The King's Bishop's Opening, The King's Gambit, The Queen's Gambit, and Irregular Openings.

Thursday, October 14, 2010

King and Rook against King : Endings of Chess Games - Part 2


To play with correctness and skill during the end of a chess game is a very rare accomplishment (except among the very best players).

In order to assist the beginning chess student as much as possible in this branch of the game, I have put together a collection of 38 diagrams illustrating 30 different chess ending positions and the proper play necessary to win the chess game.


KING AND ROOK AGAINST KING.

Diagram 2. 

BLACK.
WHITE.


  WHITE.   BLACK.
 1. R. to K. R's 7th.  1. K. to K. B's sq.
 2. K. to K's 2d.  2. K. to K. Kt's sq.
 3. R. to Q. R's 7th.  3. K. to K. B's sq.
 4. K. to K's 3d.  4. K. to K's sq.
 5. K. to K's 4th.  5. K. to Q's sq.
 6. K. to Q's 5th.  6. K. to Q. B's sq.
 7. K. to Q's 6th.  7. K. to Q. Kt's sq.
 8. R. to Q. B's 7th.  8. K. to Q. R's sq.
 9. K. to Q. B's 6th.  9. K. to Q. Kt's sq.
10. K. to Q. Kt's 6th. 10. K. to Q. R's sq.
11. R. to Q. B's 8th. Mate.


Diagram 3.
BLACK.
WHITE.


  WHITE.   BLACK.
1. R. to Q. R's 5th,

or K. Kt's 5th.
If 1. K. to B's sq.
2. R. to Q. Kt's 5th.

If 1. K. to K's sq.
2. R. to K. B's 5th. 2. K. to Q's sq.
3. R. mates at Kt's 8th or

K. B's 8th.


I know that this collection of chess ending positions is limited - but it does serve to show that careful strategic play is requisite even when the stronger party feels sure of success. Be sure to review the following lessons and diagrams in this miniseries of chess game endings:
  1. King and Queen against King : Diagram 1.
  2. King and Rook against King : Diagrams 2 and 3.
  3. King and Two Bishops against King : Diagram 4.
  4. King, Bishop, and Knight against King : Diagram 5.
  5. King and Two Knights against King : The two Knights, with the assistance of the King, cannot force checkmate, except in some very rare cases.
  6. King and Pawn / King, Bishop, and Pawn / King, Knight, and Pawn against King : Diagrams 6, 7, 8, 9, and 10.
  7. Queen against a Knight or Bishop : Diagram 11.
  8. Queen against Rook : Diagram 12.
  9. Queen against Rook and Pawn : Diagram 13.
  10. Queen against Two Bishops : Diagram 14.
  11. Queen against Two Knights : Two Knights can often draw the game against a Queen.
  12. Queen against Knight and Bishop : A King with Bishop and Knight can in many cases draw the game against a King and Queen.
  13. Queen against Queen and Pawn : Diagrams 15, 16, and 17.
  14. Queen against Pawn : Diagrams 18, 19, and 20.
  15. Rook against Bishop : Diagrams 21 and 22.
  16. Rook against Knight : Diagram 23.
  17. Rook and Pawn against Bishop : Diagram 24.
  18. Rook against Three Minor Pieces : Diagram 25.
  19. Rook and Pawn against Rook : Diagram 26.
  20. Rook against One or More Pawns : Diagrams 27, 28, and 29.
  21. Rook against Two Rooks : Diagram 30.
  22. Rook and Bishop against Rook : Diagram 31.
  23. Rook against Rook and Knight : Diagram 32.
  24. King and Pawn against King and Pawn : Diagram 33.
  25. King and Two Pawns against King and Pawn : Diagram 34.
  26. King and Two Pawns against King and Two Pawns : Diagram 35.
  27. King and Two Pawns against King and Three Pawns : Diagram 36.
  28. King against Three 'Passed' Pawns : Diagram 37.
  29. King and Three 'Passed' Pawns against King and Three 'Passed' Pawns : Diagram 38.
For you beginning chess students, I invite you go through my free online chess lessons. For you advanced chess players looking for a strategic advantage, I recommend you read through some of the other miniseries including The King's Knight's Opening, The King's Bishop's Opening, The King's Gambit, The Queen's Gambit, and Irregular Openings.

Tuesday, October 12, 2010

King and Queen against King : Endings of Chess Games - Part 1


To play with correctness and skill during the end of a chess game is a very rare accomplishment (except among the very best players).

In order to assist the beginning chess student as much as possible in this branch of the game, I have put together a collection of 38 diagrams illustrating 30 different chess ending positions and the proper play necessary to win the chess game.


KING AND QUEEN AGAINST KING.
Diagram 1.
BLACK.
WHITE.


  WHITE.   BLACK.
1. Q. to Q. R's 7th. 1. K. to Q's sq.
2. Q. to Q. Kt's 8th. Mate.

I know that this collection of chess ending positions is limited - but it does serve to show that careful strategic play is requisite even when the stronger party feels sure of success. Be sure to review the following lessons and diagrams in this miniseries of chess game endings:
  1. King and Queen against King : Diagram 1.
  2. King and Rook against King : Diagrams 2 and 3.
  3. King and Two Bishops against King : Diagram 4.
  4. King, Bishop, and Knight against King : Diagram 5.
  5. King and Two Knights against King : The two Knights, with the assistance of the King, cannot force checkmate, except in some very rare cases.
  6. King and Pawn / King, Bishop, and Pawn / King, Knight, and Pawn against King : Diagrams 6, 7, 8, 9, and 10.
  7. Queen against a Knight or Bishop : Diagram 11.
  8. Queen against Rook : Diagram 12.
  9. Queen against Rook and Pawn : Diagram 13.
  10. Queen against Two Bishops : Diagram 14.
  11. Queen against Two Knights : Two Knights can often draw the game against a Queen.
  12. Queen against Knight and Bishop : A King with Bishop and Knight can in many cases draw the game against a King and Queen.
  13. Queen against Queen and Pawn : Diagrams 15, 16, and 17.
  14. Queen against Pawn : Diagrams 18, 19, and 20.
  15. Rook against Bishop : Diagrams 21 and 22.
  16. Rook against Knight : Diagram 23.
  17. Rook and Pawn against Bishop : Diagram 24.
  18. Rook against Three Minor Pieces : Diagram 25.
  19. Rook and Pawn against Rook : Diagram 26.
  20. Rook against One or More Pawns : Diagrams 27, 28, and 29.
  21. Rook against Two Rooks : Diagram 30.
  22. Rook and Bishop against Rook : Diagram 31.
  23. Rook against Rook and Knight : Diagram 32.
  24. King and Pawn against King and Pawn : Diagram 33.
  25. King and Two Pawns against King and Pawn : Diagram 34.
  26. King and Two Pawns against King and Two Pawns : Diagram 35.
  27. King and Two Pawns against King and Three Pawns : Diagram 36.
  28. King against Three 'Passed' Pawns : Diagram 37.
  29. King and Three 'Passed' Pawns against King and Three 'Passed' Pawns : Diagram 38.
For you beginning chess students, I invite you go through my free online chess lessons. For you advanced chess players looking for a strategic advantage, I recommend you read through some of the other miniseries including The King's Knight's Opening, The King's Bishop's Opening, The King's Gambit, The Queen's Gambit, and Irregular Openings.

Sunday, October 10, 2010

Steinitz Gambit : Irregular Chess Openings - Part 6


Welcome to Part 6 of Irregular Chess Openings miniseries. Part 5 focused on The Fianchetto. This lesson will explain The Steinitz Gambit.


Game XV.—STEINITZ GAMBIT.

Between W. Steinitz and J. W. Zukertort.

Mr. William Steinitz v Mr. Johannes Hermann Zukertort


 WHITE.  (Mr. S.)   BLACK.  (Mr. Z.)
 1. P. to K's 4th.  1. P. to K's 4th.
 2. Kt. to Q. B's 3d.  2. Kt. to Q. B's 3d.
 3. P. to B's 4th.  3. P. takes P.
 4. P. to Q's 4th.  4. Q. to R's 5th. (ch.)
 5. K. to K's 2d.  5. P. to Q's 4th.[A]
 6. P. takes P.  6. B. to Kt's 5th. (ch.)
 7. Kt. to B's 3d.  7. Castles.
 8. P. takes Kt.  8. B. to Q. B's 4th.
 9. P. takes P. (ch.)  9. K. to Kt's sq.
10. Kt. to Kt's 5th.[B] 10. Kt. to B's 3d.
11. K. to Q's 3d.[C] 11. Q. to R's 4th.
12. K. to B's 3d. 12. B. takes P. (ch.)[D]
13. Q. Kt. takes B. 13. Q. to B's 4th. (ch.)
14. K. to Kt's 3d. 14. Q. to Kt's 3d. (ch.)
15. B. to Kt's 5th. 15. B. takes Kt.
16. Q. takes B. 16. R. takes Kt.
17. Q. to B's 6th. 17. Q. to R's 4th.
18. P. to B's 3d. 18. R. to Q's 3d.
19. Q. to B's 4th. 19. P. to Kt's 4th.
20. K to B's 2d. 20. Resigns.[E]

[A] The ingenious attack instituted hereby was invented by Zukertort.
[B] 10. P. takes B., Kt. to B's 3d!; 11. Q. takes R. (ch.), obtains three pieces for the Q., but loses the game. Q. to K's sq., here or on the following move, offers the only defense.
[C] Zukertort's analysis, which filled pages and pages of the Neue Berliner Schachzeitung, considered every conceivable move of White's down to P. to Q. R's 3d, but this one, upon which, in conjunction with the following K. move, Steinitz rested his gambit. 11. P. to B's 3d has been refuted in an elaborate analysis by Mr. Walter Penn Shipley, of Philadelphia.
[D] Black wins here by,


12. ... 12. P. to Q. R's 3d.
13. K. to Kt's 3d. 13. P. takes Kt.
14. P. to B's 3d. 14. R. takes P.!
15. P. takes R. 15. Q. to Q's 4th. (ch.)
16. K. to B's 2d. 16. B. to B's 4th. (ch.)
17. K. to Q's 2d. 17. B. to Kt's 5th. (ch.)
18. K. to K's 2d. 18. Kt. to Kt's 5th.!

as played by Messrs. Honegger and Raubitscheck in a consultation game against Steinitz at the Metropolitan Chess Club, 1897. If, instead of K. to Kt's 3d, 13. Kt. takes P. Black wins by R. takes P.!.

[E] White has brought his K. into safety and will remain a piece ahead. Had Black, instead of his last move, pinned the B., the game would have proceeded as follows:


19. ... 19. R. to Kt's 3d.
20. P. to Q. R's 4th. 20. P. to Q. R's 3d.
21. B. takes P. 21. R. takes P.
22. K. to B's 2d. 22. P. takes B.
23. P. takes P. 23. Q. takes P.
24. B. takes P. (ch.) and wins.


This lesson concludes my 6 part series on Irregular Chess Openings on the Learn to Play Chess blog. For you beginning chess students, I invite you go through my free online chess lessons. For you advanced chess players looking for a strategic advantage, I recommend you read through some of the other miniseries including The King's Knight's Opening, The King's Bishop's Opening, The King's Gambit, and The Queen's Gambit.